
Oggi ci sporchiamo un pò le mani e questa cosa mi rende felice! Sapete quanto sia fornita la mia board Pinterest sui DIY ma non sapete quanto mi appassioni l’argomento!
Lavorare con le mani mi rilassa e adoro l’idea di creare qualcosa di unico e originale per me o la mia casa, oppure per una persona speciale: ad esempio il mio compagno conserva tutti i biglietti e le lettere che ho creato per lui negli anni, mentre non ha potuto fare altrettanto con i pacchetti regalo (!), che cerco di confezionare in modo sempre nuovo e ispirato al mio mood del momento.
Ho in mente di portare a termine anche altri progetti per la mia casa e allora mi sono detta: perchè non condividerli sul blog? Internet è una grande fonte di ispirazione e io stessa mi documento prima di fare qualcosa che non ho mai fatto prima (ricordo ancora il video “Come montare una mensola” 🙂 ), magari questi miei consigli possono fare altrettanto per voi!
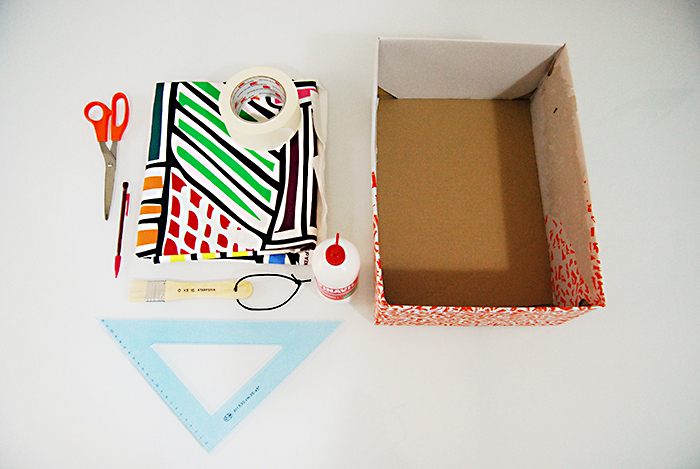
Oggi vi spiego i passaggi per rivestire in tessuto una scatola di cartone. La scatola che ho scelto è il pacco di un famoso brand di moda e l’ho scelta perchè è davvero ben fatta, il cartone è spesso e resistente e la capienza adeguata al mio scopo. Mi serviva infatti una scatola per contenere una certa quantità di piccoli fascicoli e listini A4 per studiare e fare musica.
Voi invece potreste avere bisogno di una scatola per contenere il make-up, vestiti, accessori, materiale di cartoleria: insomma quello che vi pare!
OCCORRENTE:
- scatola in cartone
- tessuto (io LILLIVI tessuto a metro Ikea)
- scotch carta
- colla vinilica
- pennello
- forbici
- matita
- squadrette
TEMPO: 1 ora e mezza, ma dipende anche dalla scatola.
Today we get our hands dirty and this makes me happy! You know how my DIY Pinterest board is fine equipped but you don’t know how much I love this subject!
I love hand labor, I like to creating something unique and original to me, my house or to a very special person: for example my partner collects all greating cards I made for him during past years, but he wasn’t able to do the same with his gift-wrap (!), always original and inspired by my mood.
My purpose is to achieve other projects for my house, so I decided to share them on my blog! Internet is a great inspiration, I usually query topics I have never experienced before (I remember “How to fix a shelf” video 🙂 ), so I hope my advices would help you in the same way!
Today I’m explaining how to cover with fabric a cardboard box. My box come from a famous fashion brand and I selected it because the cardboard is heavy and strong and dimensions are appropriate for what I needed: a storage box for a certain amount of small books and A4 folders to study and play music.
You could have necessity to store make-up, dresses, accessories, desktop stuff: what you please!
STUFF:
- cardboard box
- fabric (mine LILLIVI Ikea)
- paper tape
- vinyl glue
- brush
- scissors
- pencil
- rulers
TIME: 1 hour and half, but it depends on the box.
 PROCEDIMENTO
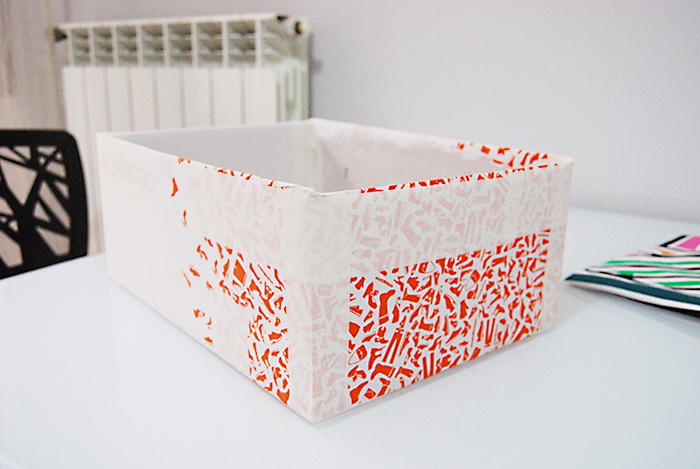
1. Per prima cosa ho rinforzato tutti gli spigoli della scatola con dello scotch carta. Con alcuni strappi ho assicurato che tutti i bordi mantengano, sia lateralmente che sotto.
HOW TO
1. First I reinforced all edges with paper tape; I fixed also lateral and underside borders.
2. Ho posizionato la scatola al centro del tessuto e ricalcato i bordi con una matita, marcando bene la posizione dei suoi spigoli.
2. I placed the box at the center of the fabric and I remarked with a pencil its borders and edges. 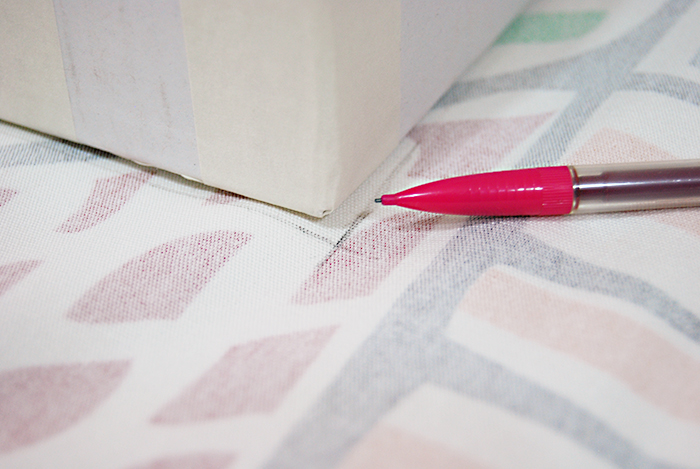
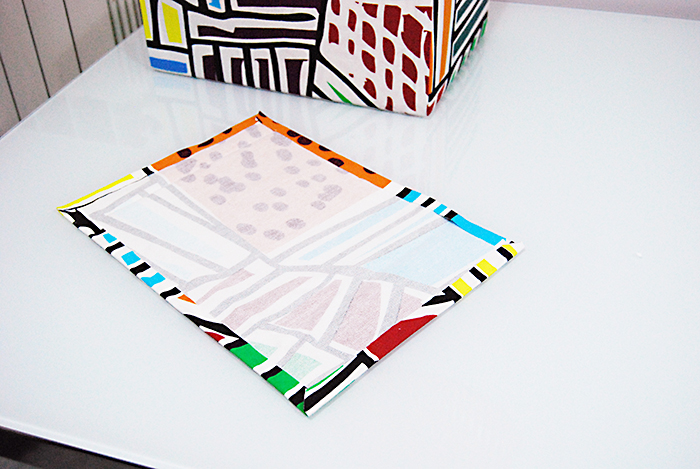
3. Ho misurato il tessuto necessario affinchè ogni lato della scatola venga ricoperto fuori e dentro. Ho disegnato la forma sul tessuto e ritagliato ad 1 cm dal bordo con le forbici.
3. I estimated the proper size of the fabric to cover the box, inside and outside. I drawn the shape on the fabric and I cut off with scissors at a distance of 1 cm.
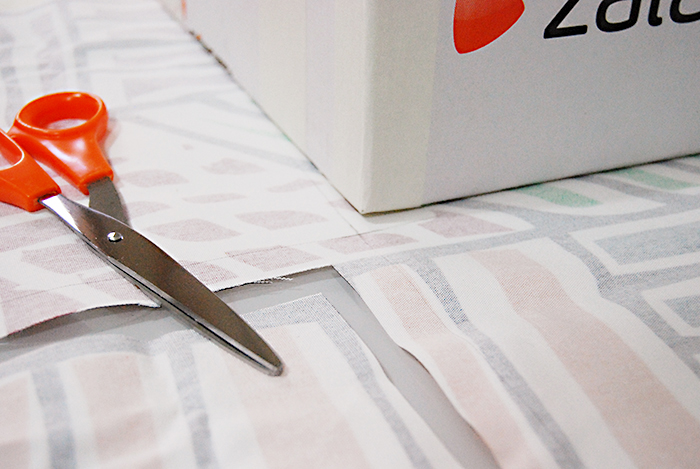
4. Poi ho fatto un taglietto al centro di ogni spigolo, senza arrivare ai segni.
4. I cut a little at the center of every edges, without reaching to the marks.
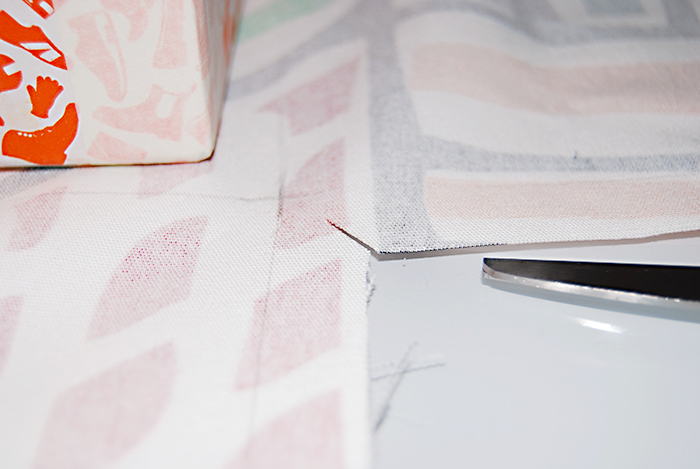
5. Ora che il tessuto è pronto avete due scelte: stirare (nooo) o bagnare con un pò d’acqua le pieghe. L’importante è ottenere un tessuto senza difetti.
5. Now you have to choices: you could iron (nooo) or you could get wet where necessary. The main thing is to have fabric without turns.
6. Ora viene il bello! Girate la scatola sottosopra e ricoprite il fondo con un bello strato di colla. Con il pennello distribuitela uniformemente su tutta la superficie.
6. Now the best is coming! Turn the box upside down and cover equally with the glue, helping yourself with the brush.
7. Girate la scatola e posizionatela al centro del vostro tessuto, proprio al centro degli spigoli ricalcati con la matita. Passate la mano sul tessuto appena incollato e fate una leggera pressione per farlo aderire bene ed evitare che si creino bolle.
7. Turn again the box and place it at the center of the pencil marks. Do a pressure by hand on the fabric just glued to escape any air bubbles.
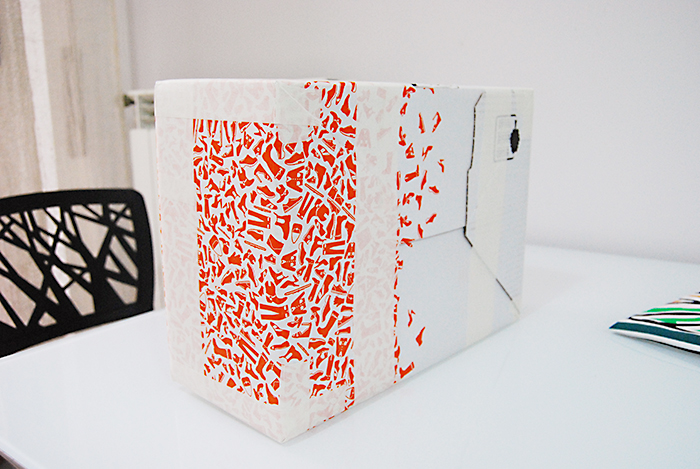
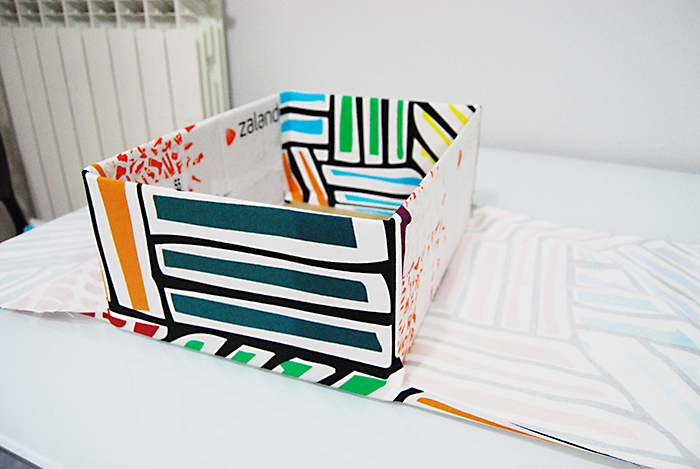
8. Ora ripetete la stessa operazione per i lati più corti della vostra scatola: rivestite prima il lato esterno e poi il lato interno. Non preoccupatevi degli spigoli, incollateli per bene al lato adiacente, come nella foto.
8. Repeat the same operation for shorter sides of the box: make attention to cover first the outside and after the inside. Don’t worry about edges, cover them to the next side, like the picture.
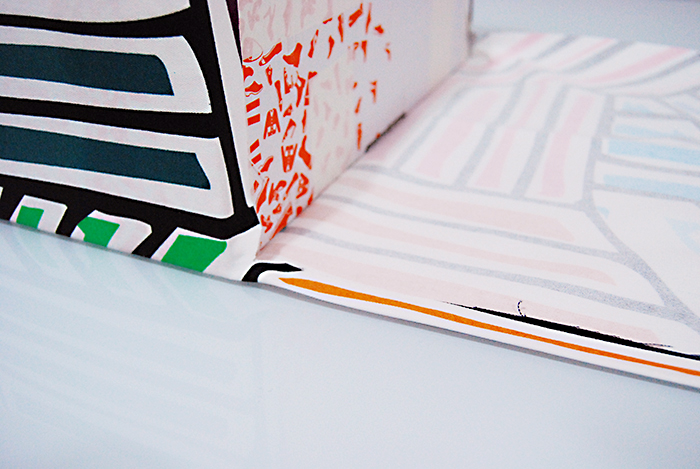
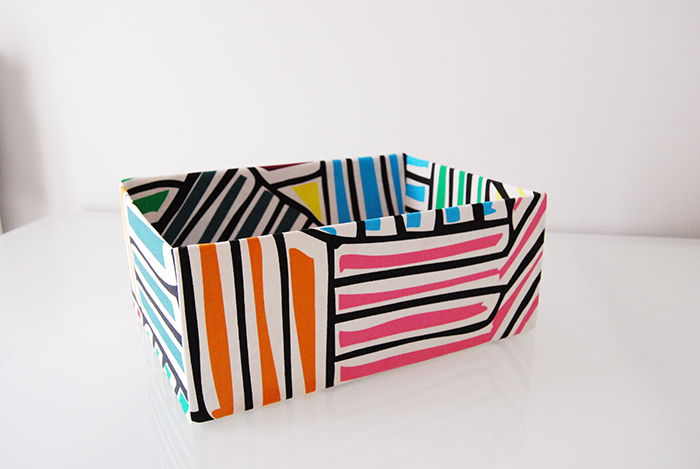
9. Occupiamoci ora del tessuto necessario a coprire lati più lunghi della scatola. Ripiegate il bordino ed incollatelo (aiutatevi con i segni a matita creati precedentemente), proprio come farebbe una sarta con ago e cotone.
9. Now get on to the long sides: fold up the little borders and glue them (look the pencil marks) like a tailor’s labor with needle-and-thread.
10. Ora rivestiamo i lati lunghi della nostra scatola, incollando sempre prima il lato esterno e poi quello interno. Con gli accorgimenti che abbiamo preso vedete che gli spigoli della vostra scatola appaiono perfetti!
10. Cover long sides of the box gluing first the outside and after the inside, as usual. You can see how the edges look great!
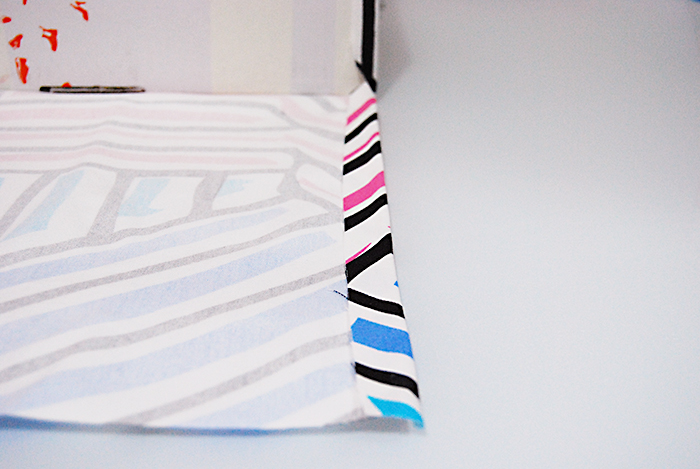
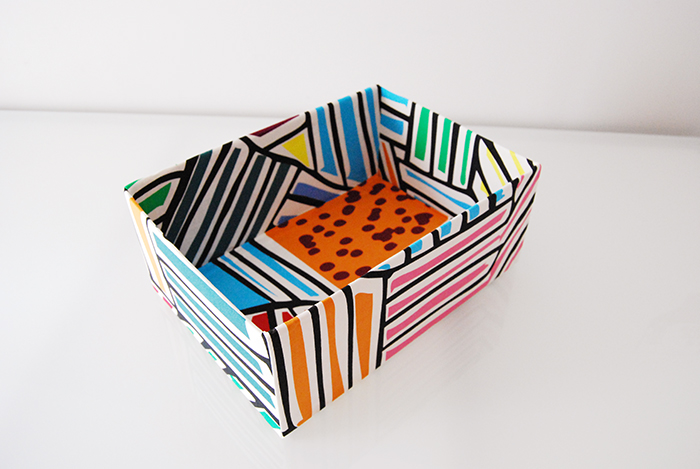
11. Per ricoprire l’ultimo lato, quello interno, disegnamo un rettangolo della dimensione necessaria e ritagliamolo più grande di un 1 cm per lato. Ripieghiamo ed incolliamo i bordini esterni come fatto in precedenza. Infine incolliamolo al fondo/lato interno della nostra scatola!
11. To cover the last side, the inner side, draw and cut a rectangle with 1 cm in excess to the right dimensions. Turn and glue borders as previous. At least glue it on the inner side of the box!
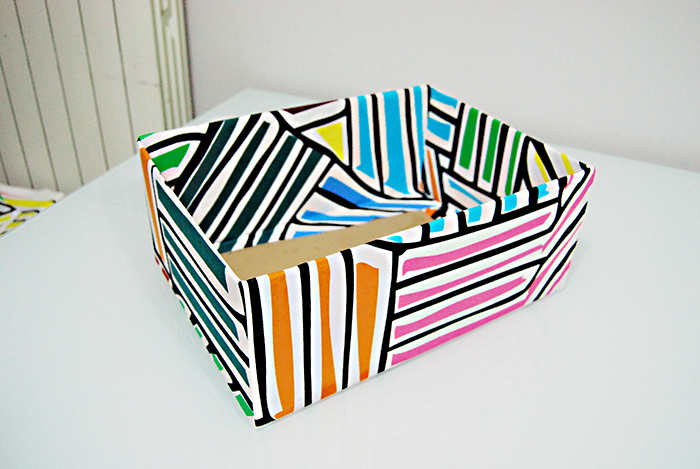
12. Lasciate asciugare del tutto (io l’ho lasciata un giorno al sole) e ammirate il risultato!
Note: io ho sciacquato il pennello tra una fase e l’altra per evitare che la colla si asciugasse e rovinasse la stesura di quella successiva.
12. Let the box dry (I leaved it one day under the sun) and enjoy the outcome!
Note: I washed the brush after any phase to escape that the glue dried and ruined the following coat.
Molto carina, non trovate?
Fatemi sapere se questa idea vi è piaciuta e se vi ho fatto venire voglia di provarci! A proposito, vi piace questa nuova rubrica dedicata ai DIY?
Very cute, isn’t it? Let me know if you liked this tutorial and if you’ll try it! By the way, do you like this new DIY section?
Adele